
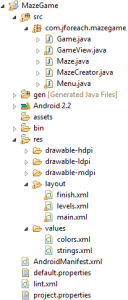
If you are a beginner Android programmer and you want to learn how to create an Android Game, then here’s a basic Android Game Programming tutorial for you. In this tutorial we will create a very simple maze based Android game called MazeMan. Here’s the preview of the game,

Note that a basic familiarity with Android programming is assumed while writing this tutorial. If you are not familiar with programming basics of android or Java, then please go through the basic Android programming tutorials before reading this Android Game Programming tutorial.
Copyright: All code in the tutorial is a property of Zoopable and should not be used without prior permissions.
Support: This tutorial is provided as is and no free support is available for it. If you are interested in general Android programming or Android game programming services and consulting, please contact us for availability.
Android Game Code Structure
These are the files in our project. We’ll quickly look at the role of each file:
There are five java files i.e. five classes.
- Menu class is an Activity which is opened when the application is launched. It creates two buttons to start a new game and exit the application.
- Game class is another activity which is launched when new game button is pressed.
- GameView is a custom View class which we use to draw the maze and tracks the ball’s movement in the maze.
- The Maze class is sort of a POJO class which stores information about the maze and the position of the ball.
- The MazeCreator is sort of our maze factory, we’ve hard coded three mazes into this class.
In the res (resources) we have 3 layout xml files and two xml files to store values. main.xml file contains the layout of the main menu which contains the new and exit buttons. Since our game has three mazes or levels, pressing the new game button opens a small dialog to choose the level, levels.xml contains the layout for that dialog. finish.xml contains the layout for the small dialog that appears when the game is finished. colors.xml contains the color codes for the ball, maze walls and maze background. strings.xml contains the string values for different buttons and labels in the application. Then there is the AndroidManifest.xml which is a core file in Android projects which you must be already familiar with.
Programming The Menus and Dialogs in Android
First lets create an Activity which will create two simple “New Game” and “Exit” buttons. This is the main activity which we’ve named Menu. We’ll also handle the click of the buttons in this class, so we’ll also implement OnClickListener in this class and override the onClick(View view) method. This is the declaration of this activity in the AndroidManifest.xml file
android:label="@string/app_name">
<intent-filter>
<action android:name="android.intent.action.MAIN" />
<category android:name="android.intent.category.LAUNCHER" />
</intent-filter>
</activity>
In the intent-filter we’ve defined this Activity to be launched when we click on the application from the application list. We’re also using a string app_name in the manifest file. So we’ll add this String along with a couple of other Strings to the strings.xml file.
<string name="btn_newgame">New Game</string>
<string name="btn_exit">Exit</string>
The layout for this activity is fairly simple. It uses a LinearLayout with two Button in it. The layout is saved as main.xml. This is the code of the layout,
<LinearLayout xmlns:android="http://schemas.android.com/apk/res/android"
android:orientation="vertical"
android:layout_width="fill_parent"
android:layout_height="fill_parent"
android:gravity="center_vertical">
<Button android:id="@+id/bNew"
android:layout_width="fill_parent"
android:layout_height="wrap_content"
android:padding="5px"
android:text="@string/btn_newgame" />
<Button android:id="@+id/bExit"
android:layout_width="fill_parent"
android:layout_height="wrap_content"
android:padding="5px"
android:text="@string/btn_exit" />
</LinearLayout>
We’ve assigned ids to both the buttons which we’ll use to register events on these buttons. We’ll move to the activity now. This is the declaration of our Menu activity
The Menu class extends the Activity class and implements OnClickListener interface. In the onCreate method of this activity, we’ll set main as the layout and add click listeners to the New Game and Exit buttons.
super.onCreate(savedInstanceState);
setContentView(R.layout.main);
Button newGame = (Button)findViewById(R.id.bNew);
Button exit = (Button)findViewById(R.id.bExit);
newGame.setOnClickListener(this);
exit.setOnClickListener(this);
}
As you can see, we set the activity instance itself, using this reference, as the click listeners for the two buttons (We could’ve used anonymous inner classes here as well but we chose not to). Here is the code that will handle the button clicks,
//check which button was clicked with its id
switch(view.getId()) {
case R.id.bExit:
finish();
break;
}
}
When the Exit button is clicked, we’ll finish the Menu activity which will effectively close the application. For the New Game button, we’ll present the user with a list so that the user can select which stage he/she wants to play. Right now our game has only three levels so we’ll present the user with a dialog which has three options for the three levels. Lets see the code of the onClick method again with the dialog implemented.
//check which button was clicked with its id
switch(view.getId()) {
case R.id.bExit:
finish();
break;
case R.id.bNew:
final String[] levels = {"1", "2", "3"};
AlertDialog.Builder builder = new AlertDialog.Builder(this);
builder.setTitle("Select Maze");
builder.setItems(levels, new DialogInterface.OnClickListener() {
public void onClick(DialogInterface dialog, int item) {
//TODO
}
});
AlertDialog alert = builder.create();
alert.show();
}
}
Now, as you can see, we are using AlertDialog.Builder to create an alert dialog with three options. The setItems method of AlertDialog.Builder class takes two parameters. The first is the list of items to display and the second is a listener for the item that is clicked by the user. When an item is clicked, the index of the clicked item is passed as the second argument to the onClick method. When the user selects a maze, we’ll start a new Activity that will handle the actual game. In our application, this is implemented in Game class. The maze itself is represented as an instance of Maze class in our application. We’ll pass the Game activity class an instance of the Maze class based on which maze is selected by the user. We have also created a helper class named MazeCreator which takes the maze number as argument and returns a corresponding Maze instance. We’ll go into the details of how the maze is implemented, but for now, this is how the code on the click of the New Game button looks like when we handle selecting one of the three mazes,
String[] levels = {"Maze 1", "Maze 2", "Maze 3"};
AlertDialog.Builder builder = new AlertDialog.Builder(this);
builder.setTitle(getString(R.string.levelSelect));
builder.setItems(levels, new DialogInterface.OnClickListener() {
public void onClick(DialogInterface dialog, int item) {
Intent game = new Intent(Menu.this,Game.class); //create an Intent to launch the Game Activity
Maze maze = MazeCreator.getMaze(item+1); //use helper class for creating the Maze
game.putExtra("maze", maze); //add the maze to the intent which we'll retrieve in the Maze Activity
startActivity(game);
}
});
AlertDialog alert = builder.create();
alert.show();
In our code, we created an Intent to launch the Game activity. We pass the Maze instance to this activity as an extra using the putExtra method of the Intent class. The code for Game activity is also very simple. For drawing the maze, we use a custom View named GameView. The Game activity merely creates an instance of the GameView class and sets it as the content view for the activity. Here is the complete code for the Game activity,
public void onCreate(Bundle bundle) {
super.onCreate(bundle);
Intent intent = getIntent();
Bundle extras = intent.getExtras(); //get the intent extras
Maze maze = (Maze)extras.get("maze"); //retrieve the maze from intent extras
GameView view = new GameView(this,maze);
setContentView(view);
}
}
As you can see, it gets the Maze instance from the Intent, passes it to the GameView and sets the view as the content view. We’ll also add this activity to the manifest file,
<activity android:name=".Game"></activity>
Implementing and Drawing the Maze
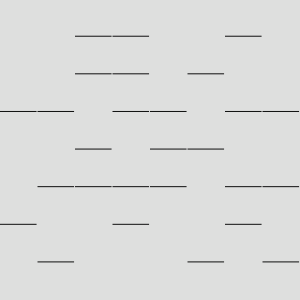
Now the pieces of the puzzle that are left are how the maze is implemented and how it is displayed in the GameView. The other class that we didn’t show you i.e. MazeCreator is fairly simple to understand once you understand the maze’s working. The way we’ve implemented our maze is that the maze stores the location of walls in the maze in two 2D boolean arrays. One of the arrays stores vertical walls of the maze and the other stores the horizontal walls of the maze. We’ll take one of our mazes as an example,
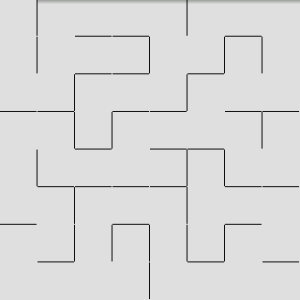
Now the first boolean array will store the values for the vertical lines of the maze,
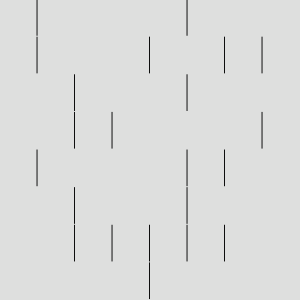
Wherever there is a wall, there will be true value in the boolean array, and where there is no wall, the value will be false. So the values in the vertical lines array would be like this,
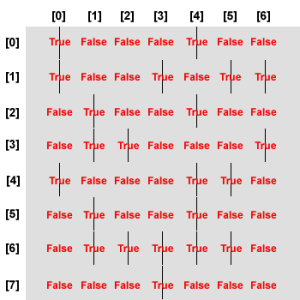
So the vertical lines will be represented by an array of size [8][7]. In a similar way, the horizontal lines in the maze will be represented by an array of size [7][8]. Both these arrays are stored in the Maze class
A part from these two arrays, the maze stores the X and Y positions of the finishing point in the maze and the current position of the ball in the maze. When the game starts the current position of the ball will be the starting point of the ball. The Maze class also finds out the horizontal and vertical size of the maze (which are basically the size of the two dimensions of the boolean arrays). Maze class also contains one additional boolean variable gameComplete which indicates if the game is over[1]. The game will be over when the ball reaches the finishing point. This is the code for the Maze class,
private static final long serialVersionUID = 1L;
public static final int UP = 0, DOWN = 1, RIGHT = 2, LEFT = 3;
private boolean[][] verticalLines;
private boolean[][] horizontalLines;
private int sizeX, sizeY; //stores the width and height of the maze
private int currentX, currentY; //stores the current location of the ball
private int finalX, finalY; //stores the finishing point of the maze
private boolean gameComplete;
//setters and getters
}
Since we add the Maze instance as an extra in the Intent we used to start the Game activity, so we’ve implemented Serializable interface in this class. Apart from the getters and setters, there is one additional method in this Maze class named move. This method is called when the user presses a key to move the ball. The direction which the user wants the ball to move is passed to this method as an argument. The class also has four static int constants which represent the directions for the ball’s movement[2]. This method has the logic which finds out if the ball can move in the given direction. If the ball can move in the given direction, this method changes the value of currentX or currentY accordingly. If there is a wall in the direction user wants to move or if the ball is on the edge of the maze in direction of the movement, then currentX and currentY are not modified. This method also checks if the game is complete if the ball is moved. This method returns true if the ball was moved and false if it was not moved. This way if the ball was moved the view can update the screen to show the new location of the ball. Here is the code of the move method,
boolean moved = false;
if(direction == UP) {
if(currentY != 0 && !horizontalLines[currentY-1][currentX]) {
currentY--;
moved = true;
}
}
if(direction == DOWN) {
if(currentY != sizeY-1 && !horizontalLines[currentY][currentX]) {
currentY++;
moved = true;
}
}
if(direction == RIGHT) {
if(currentX != sizeX-1 && !verticalLines[currentY][currentX]) {
currentX++;
moved = true;
}
}
if(direction == LEFT) {
if(currentX != 0 && !verticalLines[currentY][currentX-1]) {
currentX--;
moved = true;
}
}
if(moved) {
if(currentX == finalX && currentY == finalY) {
gameComplete = true;
}
}
return moved;
}
The code is very simple, we check in which direction user wants to move and see if there is a wall in that direction or if it is an edge of the maze. If both are not the case, we move the ball. At last we check if the ball has reached the finishing point and if it has, we set gameComplete to true. Lets quickly look at the The getMaze method of MazeCreator class, which we used in Menu activity. This method merely creates an instance of Maze class and sets its walls, starting position of the ball and finishing point and returns that maze instance.
Maze maze = null;
if(mazeNo == 1) {
maze = new Maze();
boolean[][] vLines = new boolean[][]{
{true ,false,false,false,true ,false,false},
{true ,false,false,true ,false,true ,true },
{false,true ,false,false,true ,false,false},
{false,true ,true ,false,false,false,true },
{true ,false,false,false,true ,true ,false},
{false,true ,false,false,true ,false,false},
{false,true ,true ,true ,true ,true ,false},
{false,false,false,true ,false,false,false}
};
boolean[][] hLines = new boolean[][]{
{false,false,true ,true ,false,false,true ,false},
{false,false,true ,true ,false,true ,false,false},
{true ,true ,false,true ,true ,false,true ,true },
{false,false,true ,false,true ,true ,false,false},
{false,true ,true ,true ,true ,false,true ,true },
{true ,false,false,true ,false,false,true ,false},
{false,true ,false,false,false,true ,false,true }
};
maze.setVerticalLines(vLines);
maze.setHorizontalLines(hLines);
maze.setStartPosition(0, 0);
maze.setFinalPosition(7, 7);
}
//other mazes
return maze;
}
The GameView Class
Now there is only one thing left for us to see. Its the GameView class. GameView class extends from View class and override onSizeChanged, onDraw and onKeyDown methods. It has a few fields which will store the total width and height of the screen[3], the width and height of the maze, the width and height of cells, the finishing point of the maze, the Activity object which called this view, the Maze object to display and a few drawing related objects of Paint class. These are the fields in the GameView class
private int mazeSizeX, mazeSizeY;
float cellWidth, cellHeight;
float totalCellWidth, totalCellHeight;
private int mazeFinishX, mazeFinishY;
private Maze maze;
private Activity context;
private Paint line, red, background;
We could’ve avoided having some fields like mazeSizeX, mazeSizeY, totalCellWidth, totalCellHeight, mazeFinishX and mazeFinishY. But that would mean that we would have to either calculate these values each time we draw on the screen or get these values from the Maze object. Having a local copy of these fields doesn’t take that much memory and saves some processor time so we’ve made a copy of them. Some of these fields we’ll initialize in the constructor, but some fields like width, height etc depends upon the display resolution of the device. The display resolution is not known in the constructor. Android calls the onSizeChanged with the screen size after constructing the view. So we’ll initialize those fields in the onSizeChanged method. We’ll need three color values for the maze, one black for the maze walls, second red for the ball and the finishing point and one grey for the maze background. So we’ll create a file named colors.xml inside res/values which will have this code
<resources>
<color name="game_bg">#dddddd</color>
<color name="line">#000000</color>
<color name="position">#ff0000</color>
</resources>
Now that we have these values, lets see the code of the constructor of GameView class
super(context);
this.context = (Activity)context;
this.maze = maze;
mazeFinishX = maze.getFinalX();
mazeFinishY = maze.getFinalY();
mazeSizeX = maze.getMazeWidth();
mazeSizeY = maze.getMazeHeight();
line = new Paint();
line.setColor(getResources().getColor(R.color.line));
red = new Paint();
red.setColor(getResources().getColor(R.color.position));
background = new Paint();
background.setColor(getResources().getColor(R.color.game_bg));
setFocusable(true);
this.setFocusableInTouchMode(true);
}
The constructor recieves the instance of Game class as first parameter (named context) and the maze as second parameter[4]. We pass the Game instance to the super constructor of View class. We also keep the Game instance in case we need it. We store the Maze instance to draw and we also create a local copy of the finishing point of the maze and the size of the maze. We then initialize the three Paint instances which we’ll use to draw maze background, walls and the ball. Then we give our GameView the ability to grab focus so that the user would be able to press keys to move the ball. The second Paint object i.e. red will also be used to draw “F” for the finishing point, but its text size cannot be decided yet because we don’t know the screen size and thus we don’t know the cell size. Now we move on to the onSizeChanged method. Here we will know the screen size so we’ll also be able to find out the size of each cell.
width = (w < h)?w:h; //check whether the width or height of the screen is smaller
height = width; //for now square mazes
lineWidth = 1; //for now 1 pixel wide walls
cellWidth = (width - ((float)mazeSizeX*lineWidth)) / mazeSizeX;
totalCellWidth = cellWidth+lineWidth;
cellHeight = (height - ((float)mazeSizeY*lineWidth)) / mazeSizeY;
totalCellHeight = cellHeight+lineWidth;
red.setTextSize(cellHeight*0.75f);
super.onSizeChanged(w, h, oldw, oldh);
}
The method is passed the new height and width and the old height and width. The last two parameters matter when the view is already rendered and the screen size changes either because the device was rotated or some other reason. We’ll draw on a square surface as our mazes are square so we find whatever is smaller width or height. The width of walls is fixed at 1 pixel for now. The cell width and height is calculated by subtracting the space occupied by the maze walls from the total width/height. Then we divide the resulting value by the number of horizontal/vertical cells in the maze to get the cell width and height. In our case both cell width and height will be the same but having two separate values means relatively less changes in future, if we want to create rectangular mazes. Now that we know the cell size, we can also set the text size of the Paint object to show the letter “F” on the finishing point. At last we call the onSizeChanged method of View class to do any default processing.
After this, its time to override the onDraw method to draw the maze. This method is passed an instance of Canvas class which you can use to draw lines, circles, text etc. If you have worked with Applets, Canvas is similar to the java.awt.Graphics object. Here is the code for the onDraw method,
//fill in the background
canvas.drawRect(0, 0, width, height, background);
boolean[][] hLines = maze.getHorizontalLines();
boolean[][] vLines = maze.getVerticalLines();
//iterate over the boolean arrays to draw walls
for(int i = 0; i < mazeSizeX; i++) {
for(int j = 0; j < mazeSizeY; j++){
float x = j * totalCellWidth;
float y = i * totalCellHeight;
if(j < mazeSizeX - 1 && vLines[i][j]) {
//we'll draw a vertical line
canvas.drawLine(x + cellWidth, //start X
y, //start Y
x + cellWidth, //stop X
y + cellHeight, //stop Y
line);
}
if(i < mazeSizeY - 1 && hLines[i][j]) {
//we'll draw a horizontal line
canvas.drawLine(x, //startX
y + cellHeight, //startY
x + cellWidth, //stopX
y + cellHeight, //stopY
line);
}
}
}
int currentX = maze.getCurrentX(),currentY = maze.getCurrentY();
//draw the ball
canvas.drawCircle((currentX * totalCellWidth)+(cellWidth/2), //x of center
(currentY * totalCellHeight)+(cellWidth/2), //y of center
(cellWidth*0.45f), //radius
red);
//draw the finishing point indicator
canvas.drawText("F",
(mazeFinishX * totalCellWidth)+(cellWidth*0.25f),
(mazeFinishY * totalCellHeight)+(cellHeight*0.75f),
red);
}
In the onDraw method we first draw a rectangle as the maze background. Then we iterate over the boolean arrays in the Maze class which represent the horizontal vertical lines. If the value in those boolean arrays is true, we draw the corresponding vertical or horizontal line. After that we find out the current location of our ball and draw the ball in that cell. At last we indicate the finishing point by drawing the “F” letter at the finishing point. This is all that’s needed to draw the whole maze. Now all that we need to do is handle the ball movements when the user presses arrow keys.
Lets look at the onKeyDown method now to handle the pressing of the arrow keys. The onKeyDown method returns true if the key press was handled otherwise it returns false. We’ll handle only the arrow keys, other keys we’ll not handle.
public boolean onKeyDown(int keyCode, KeyEvent evt) {
boolean moved = false;
switch(keyCode) {
case KeyEvent.KEYCODE_DPAD_UP:
moved = maze.move(Maze.UP);
break;
case KeyEvent.KEYCODE_DPAD_DOWN:
moved = maze.move(Maze.DOWN);
break;
case KeyEvent.KEYCODE_DPAD_RIGHT:
moved = maze.move(Maze.RIGHT);
break;
case KeyEvent.KEYCODE_DPAD_LEFT:
moved = maze.move(Maze.LEFT);
break;
default:
return super.onKeyDown(keyCode,evt);
}
if(moved) {
//the ball was moved so we'll redraw the view
invalidate();
}
return true;
}
The onKeyDown method accepts two arguments. We only need to check which key was pressed so we’ll just need the first argument. The second argument provides us extra information like if the Shift key was pressed when this key was pressed. We’ll use a switch case to see which key was pressed. Based on the arrow key which was pressed, we’ll call the move method of Maze object passing it the direction to move the ball. If any key other than the arrow keys is pressed, we’ll pass the processing to the onKeyDown method of View class so that default processing can be done. Now if the ball actually moved due to the keypress, we call invalidate method. This will result in the view to be redrawn i.e. onDraw method will be executed. We are only lacking one thing now, when the ball is moved, we need to check if the ball reached the finish. If the game is completed, we’ll show a dialog box to congratulate the user and end the game. For this we’ll first need three values in strings.xml file. Here are those values,
<string name="finished_text">Level Cleared</string>
<string name="finished_button">End Game</string>
We’ll also need to create a small layout for the dialog box. We’ll save it in the file finish.xml in the res/layout folder. Here is the layout for the finish dialog,
<LinearLayout
xmlns:android="http://schemas.android.com/apk/res/android"
android:orientation="vertical"
android:layout_width="wrap_content"
android:layout_height="wrap_content"
android:layout_gravity="center_horizontal">
<TextView android:text="@string/finished_text"
android:layout_width="fill_parent"
android:layout_height="wrap_content"
android:paddingLeft="10px"/>
<Button android:text="@string/finished_button"
android:id="@+id/closeGame"
android:layout_width="fill_parent"
android:layout_height="wrap_content"/>
</LinearLayout>
Nothing fancy here too, just a TextView and one Button. Lets modify the code in onKeyDown method to show this dialog when the game is finished,
//the ball was moved so we'll redraw the view
invalidate();
if(maze.isGameComplete()) {
//game completed
AlertDialog.Builder builder = new AlertDialog.Builder(context);
builder.setTitle(context.getText(R.string.finished_title));
LayoutInflater inflater = context.getLayoutInflater();
View view = inflater.inflate(R.layout.finish, null);
builder.setView(view);
View closeButton =view.findViewById(R.id.closeGame);
closeButton.setOnClickListener(new OnClickListener() {
@Override
public void onClick(View clicked) {
if(clicked.getId() == R.id.closeGame) {
context.finish();
}
}
});
AlertDialog finishDialog = builder.create();
finishDialog.show();
}
}
After invalidating the view, we’ll check the Maze object to see if the game is over. If it is, we’ll create a dialog using AlertDialog.Builder. We set the title of the dialog and use the LayoutInflater to inflate the finish layout. The inflated layout is set as the view of the dialog. We also add a listener on the button in the dialog to end the game when it is clicked.
That’s it, our Android Game Programming tutorial is now complete and we’ve created our first android game, MazeMan. In this part of the tutorial, we’ve only used key based navigation. In the next part of this tutorial we’ll add touch based playing capabilities to the game.
The full source code of the game is available for download as an Eclipse project. Alternatively you can also directly install the apk file of the game in your simulator or mobile device. The apk file is in the bin folder of the downloaded project.
Download Android Game Source Code
Notes
[1]The size variables and the gameComplete are a little redundant as you can easily find these values from the other fields of the class, but we find this approach to be easier to understand.
[2]We could’ve used enums here, but since we are working on a mobile device, we want to keep things simple and fast.
[3]Since our mazes are square, our view draws in a square area as opposed to the whole screen.
[4]Our GameView class doesn’t have a constructor which takes a Context and an AttributeSet as parameter, this means we can’t use the View through XML layouts. But we didn’t create such a constructor as we’re not going to use the GameView through an xml file.