In the earlier Android Game Programming tutorial, you may have noticed that the Android Game we created had only keyboard input support. In this tutorial, we will add touch support to the MazeMan, the Android Game we created.
The reason for adding touch support to the Android game is that most of the Android devices don’t have a keypad or track pad. Thus we’ll add touch support along with some other capabilities to our maze game in this second installment of Android Game programming tutorial services.
Note that we will not cover all the changes we’ve made to the Android game in this tutorial but we’ll cover the most important parts. If you are familiar with Android Game programming, you should easily understand the changes.
Persisting Game State in Android Game During Rotation
If you try to run the previous version of the game and you start a new game and move the ball a few blocks and then rotate the screen, then the ball’s position is reset i.e. it returns to its starting point. This is because we were not maintaining the state of the game.
To retain the game’s state i.e. the location of the ball, we’ll give the Maze instance to Android during the rotation (the Maze instance stores the location of the ball). We’ll get that instance back in our Game activity so that we can restore the game to its previous state. For this in our Game activity we’ll override the onRetainNonConfigurationInstance method.
Android calls this method when the phone is rotated so that the Activity can maintain its state. This method returns an Object which is retained by Android and provided to us again. We’ll return the Maze instance from this method. In the onCreate method we’ll call the getLastNonConfigurationInstance method of Activity class to get the instance of Maze class which we persisted during the rotation. When the Game activity is called first time, the getLastNonConfigurationInstance method returns null. Lets see the code of Game activity.
Maze maze;
public void onCreate(Bundle bundle) {
super.onCreate(bundle);
Intent intent = getIntent();
Bundle extras = intent.getExtras();
this.maze = (Maze)getLastNonConfigurationInstance();
if(this.maze == null) {
this.maze = (Maze)extras.get("maze");
}
GameView view = new GameView(this);
view.setMaze(this.maze);
setContentView(view);
}
public Object onRetainNonConfigurationInstance() {
return this.maze;
}
}
The important piece of code here is at line 7 and 15. We use the getLastNonConfigurationInstance method to get instance of Maze class. If this method returns null, it means the onCreate method is called first time and not due to a rotation. So we’ll get the Maze instance from the Intent extras.
Adding Touch Support to Move the Ball
Now for the interesting stuff, moving the ball by touching it. First of all to handle the touch even we’ll override the onTouchEvent method in GameView class. This method is called when user presses on the screen and then start dragging something. The method gets a MotionEvent instance as parameter returns a boolean value indicating if the event was handled. In this method we’ll first check if the touch is on the ball, if it is we’ll set a flag variable to true that the user is dragging the ball.
float touchX = event.getX();
float touchY = event.getY();
int currentX = maze.getCurrentX();
int currentY = maze.getCurrentY();
switch (event.getAction() & MotionEvent.ACTION_MASK) {
case MotionEvent.ACTION_DOWN:
//touch gesture started
if(Math.floor(touchX/totalCellWidth) == currentX &&
Math.floor(touchY/totalCellHeight) == currentY) {
//touch gesture in the cell where the ball is
dragging = true;
return true;
}
break;
//more code to follow
}
return false;
}
From the MotionEvent object we first get the X and Y coordinates of the touch event. Then we get the current position of the ball from the Maze instance. In the switch we check which type of touch event happened. We are using the getAction() method to get the action so we have to use the ACTION_MASK with a bitwise & operator. From Android 2.2 you can use getActionMasked() method too, then you won’t need the ACTION_MASK. If the action is start of a touch gesture, we check if the touch is in the current cell of the ball. If it is, we set a boolean flag variable (named dragging) to true. In this case we’ve handled the even so we’ll return true from the method. We’ll set the dragging boolean variable to false when user ends the touch gesture. When the user moves his/her finger during while touching the screen, and the dragging flag is true, we’ll check if the user has moved to a nearby cell. If the user has moved his/her finger to a nearby cell of the ball’s current location, we use the Maze class instance to check if the move is valid. This is sort of the same logic we used when we handled key based ball movement. Here’s the rest of the code of onTouchEvent method.
//touch gesture completed
dragging = false;
return true;
case MotionEvent.ACTION_MOVE:
if(dragging) {
int cellX = (int)Math.floor(touchX/totalCellWidth);
int cellY = (int)Math.floor(touchY/totalCellHeight);
if((cellX != currentX && cellY == currentY) ||
(cellY != currentY && cellX == currentX)) {
//either X or Y changed
boolean moved = false;
//check horizontal ball movement
switch(cellX-currentX) {
case 1:
moved = maze.move(Maze.RIGHT);
break;
case -1:
moved = maze.move(Maze.LEFT);
}
//check vertical ball movement
switch(cellY-currentY) {
case 1:
moved = maze.move(Maze.DOWN);
break;
case -1:
moved = maze.move(Maze.UP);
}
if(moved) {
//the ball was moved so we'll redraw the view
invalidate();
if(maze.isGameComplete()) {
//game is finished
showFinishDialog();
}
}
}
return true;
}
When the touch action is ACTION_UP we set the dragging flag to false. When the touch action is ACTION_MOVE then we check if the touch has moved to a nearby cell, if it did we check if the move is valid in the Maze and invalidate() the view if the ball was moved. If the ball has reached the finishing point, then we show the finish dialog. The code of showing finish dialog when game is finished by keypad or touch is the same so we moved it to showFinishDialog() method. Here’s the code of showFinishDialog() method.
AlertDialog.Builder builder = new AlertDialog.Builder(context);
builder.setTitle(context.getText(R.string.finished_title));
LayoutInflater inflater = (LayoutInflater)context.
getSystemService(Context.LAYOUT_INFLATER_SERVICE);
View view = inflater.inflate(R.layout.finish, null);
builder.setView(view);
final AlertDialog finishDialog = builder.create();
View closeButton =view.findViewById(R.id.closeGame);
closeButton.setOnClickListener(new OnClickListener() {
@Override
public void onClick(View clicked) {
if(clicked.getId() == R.id.closeGame) {
finishDialog.dismiss();
((Activity)context).finish();
}
}
});
finishDialog.show();
}
This is the same code we used in the previous version of the game to show the finish dialog but we’ve moved it to a separate method now.
Adding Preferences to the Game
One of the good features about Android is Preferences or Settings of an application. Android provides a PreferenceActivity class for this purpose. For the MazeMan game we have preferences for background, ball and line colors in the game. First of all we’ll add a few values to the res/values/strings.xml file. These are the new values
<string name="prefs_game">Game Look</string>
<string name="prefs_ball_color">Ball Color</string>
<string name="prefs_ball_color_title">Select a Ball Color</string>
<string name="prefs_wall_color">Line Color</string>
<string name="prefs_wall_color_title">Select a Line Color</string>
<string name="prefs_back_color">Background Color</string>
<string name="prefs_back_color_title">Select a Background Color</string>
Next we’ll create a new file res/values/arrays.xml. In this file we’ll store the different colors available and their hexadecimal codes
<resources>
<string-array name="bg_colors">
<item>White</item>
<item>Grey</item>
<item>Peach</item>
</string-array>
<string-array name="bg_color_codes">
<item>#FFFFFF</item>
<item>#DDDDDD</item>
<item>#FFE5B4</item>
</string-array>
<string-array name="wall_colors">
<item>Black</item>
<item>Dark Blue</item>
<item>Maroon</item>
</string-array>
<string-array name="wall_color_codes">
<item>#000000</item>
<item>#000088</item>
<item>#800000</item>
</string-array>
<string-array name="ball_colors">
<item>Black</item>
<item>Blue</item>
<item>Red</item>
</string-array>
<string-array name="ball_color_codes">
<item>#000000</item>
<item>#0000FF</item>
<item>#FF0000</item>
</string-array>
</resources>
As you can see we have three set of color names and color codes for background, ball and lines or walls. Next we’ll create a new file for the preferences layout res/xml/preferences.xml. This file is similar to the other layout files but it contains some special tags used for preferences layouts.
<PreferenceScreen
xmlns:android="http://schemas.android.com/apk/res/android">
<PreferenceCategory android:title="@string/prefs_game">
<ListPreference
android:key="bgColor"
android:title="@string/prefs_back_color"
android:entries="@array/bg_colors"
android:entryValues="@array/bg_color_codes"
android:dialogTitle="@string/prefs_back_color_title" />
<ListPreference
android:key="wallColor"
android:title="@string/prefs_wall_color"
android:entries="@array/wall_colors"
android:entryValues="@array/wall_color_codes"
android:dialogTitle="@string/prefs_wall_color_title" />
<ListPreference
android:key="ballColor"
android:title="@string/prefs_ball_color"
android:entries="@array/ball_colors"
android:entryValues="@array/ball_color_codes"
android:dialogTitle="@string/prefs_ball_color_title" />
</PreferenceCategory>
</PreferenceScreen>
The root tag here is PreferenceScreen. It can contain direct preferences or we can group preferences using the PreferenceCategory tag as we’ve used here. We are only using ListPreference as the only options in our game are to select a color from a list of colors. There are other types of preferences as well like CheckBoxPreference and EditTextPreference. Each preference is given a name to be used in code using key attribute as we’ve used here. Then each preference is given a display name for user using title attribute. You can also give a descriptive text about the preference using summary attribute. For a ListPreference we have to provide it a list of options to be displayed and their corresponding values to be used in code. We use the entries and entryValues attributes respectively for this. When you touch a list preference the list of values is shown in a small dialog, we can provide a title for that dialog using dialogTitle attribute.
We are almost set with our preferences, now to show the preferences we just need to create a new PreferenceActivity class and call it at the click of a button. First lets create the activity class. The PreferenceActivity we’ll use has bare minimum code, this is the complete class
@Override
public void onCreate(Bundle savedInstanceState) {
super.onCreate(savedInstanceState);
addPreferencesFromResource(R.xml.preferences);
}
}
We just need to extend PreferenceActivity class and in the onCreate method call the addPreferencesFromResource method with the preferences layout that we created. Android will itself handle showing the preferences and saving them. Now we need to call this activity on a button, so we’ll add a new button to the menu layout and handle its click event. Here’s the code add in menu.xml and Menu.java activity
android:layout_width="fill_parent"
android:layout_height="wrap_content"
android:padding="5px"
android:text="@string/prefs" />
....
Button bPrefs = (Button)findViewById(R.id.bPrefs);
bPrefs.setOnClickListener(this);
....
}
public void onClick(View view) {
switch(view.getId()) {
case R.id.bPrefs:
Intent prefs = new Intent(Menu.this,AppPreferences.class);
startActivity(prefs);
break;
....
This code is straight forward. Lets move on to the last part of things, how do we retrieve these preferences. We’ll retrieve these preferences in GameView class. For each color we’ll use the default colors from colors.xml if they are not set in preferences. To get the preferences for our application, we’ll call the PreferenceManager.getDefaultSharedPreferences() method. This method takes a Context as argument so we’ll pass it the Activity instance that we receive in the constructor. Here’s the new constructor of our GameView class.
....
//get game colors from preferences
SharedPreferences prefs = PreferenceManager.getDefaultSharedPreferences(context);
int bgColor = getResources().getColor(R.color.game_bg);
String bgColorStr = prefs.getString("bgColor","");
if(bgColorStr.length() > 0) {
bgColor = Color.parseColor(bgColorStr);
}
int lineColor = getResources().getColor(R.color.line);
String lineColorStr = prefs.getString("wallColor","");
if(lineColorStr.length() > 0) {
lineColor = Color.parseColor(lineColorStr);
}
int ballColor = getResources().getColor(R.color.position);
String ballColorStr = prefs.getString("ballColor","");
if(ballColorStr.length() > 0) {
ballColor = Color.parseColor(ballColorStr);
}
line = new Paint();
line.setColor(lineColor);
ball = new Paint();
ball.setColor(ballColor);
background = new Paint();
background.setColor(bgColor);
setFocusable(true);
this.setFocusableInTouchMode(true);
}
The PreferenceManager.getDefaultSharedPreferences() method returns an instance of SharedPreferences class. On the SharedPreferences object we call the getString() method to get a preference value. The first parameter to this method is the preference name or key, and the 2nd parameter is the default value if the preference is not set. Since the default value we’ve provided as a blank string, so we check if the preference value’s length is greater than zero. If it is we use the Color.parseColor() method to parse the String hexadecimal color code into an int color code.
That’s it, we’ve mainly covered touch and preferences in this part of the Android Game Programming tutorial. You can download the complete source of the Android game which includes some other changes to the application as well which you can explore and enjoy.
Download Source Code Android Game With Touch Support
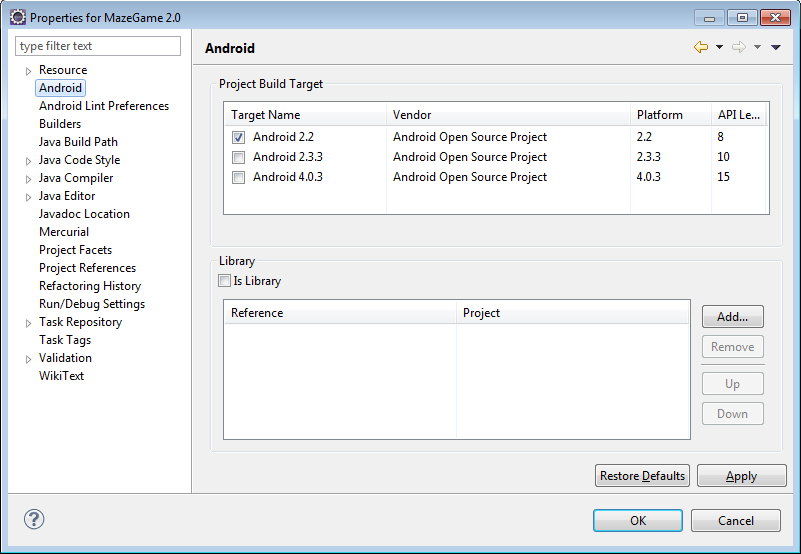
Note: When you open the project you might get an error about “Unable to resolve target ‘android-7′”. To solve this problem you just have to go to the project properties, then from the Android tab select a project build target which will solve the problem.
